
Tuckpointing & Repointing · Chicagoland, IL
How to Spot a Bad Tuckpointing Job: Red Flags Every Chicago Homeowner Should Check
A bad tuckpointing job hides in plain sight — smeared mortar, wrong colors, and shallow grinding that fails in a season or two. Here's how to inspect the work like a mason and know whether you got what you paid for.
2026-07-09
Quick Answer
A bad tuckpointing job shows smeared mortar on brick faces, wrong-color or wrong-profile joints, shallow grinding, feathering over old mortar, and skipped brick repairs. This guide walks you through inspecting the work yourself, joint by joint. Emerald Masonry LLC does color- and profile-matched tuckpointing across Chicagoland — family-owned, career masons, free estimates (708) 288-1696.
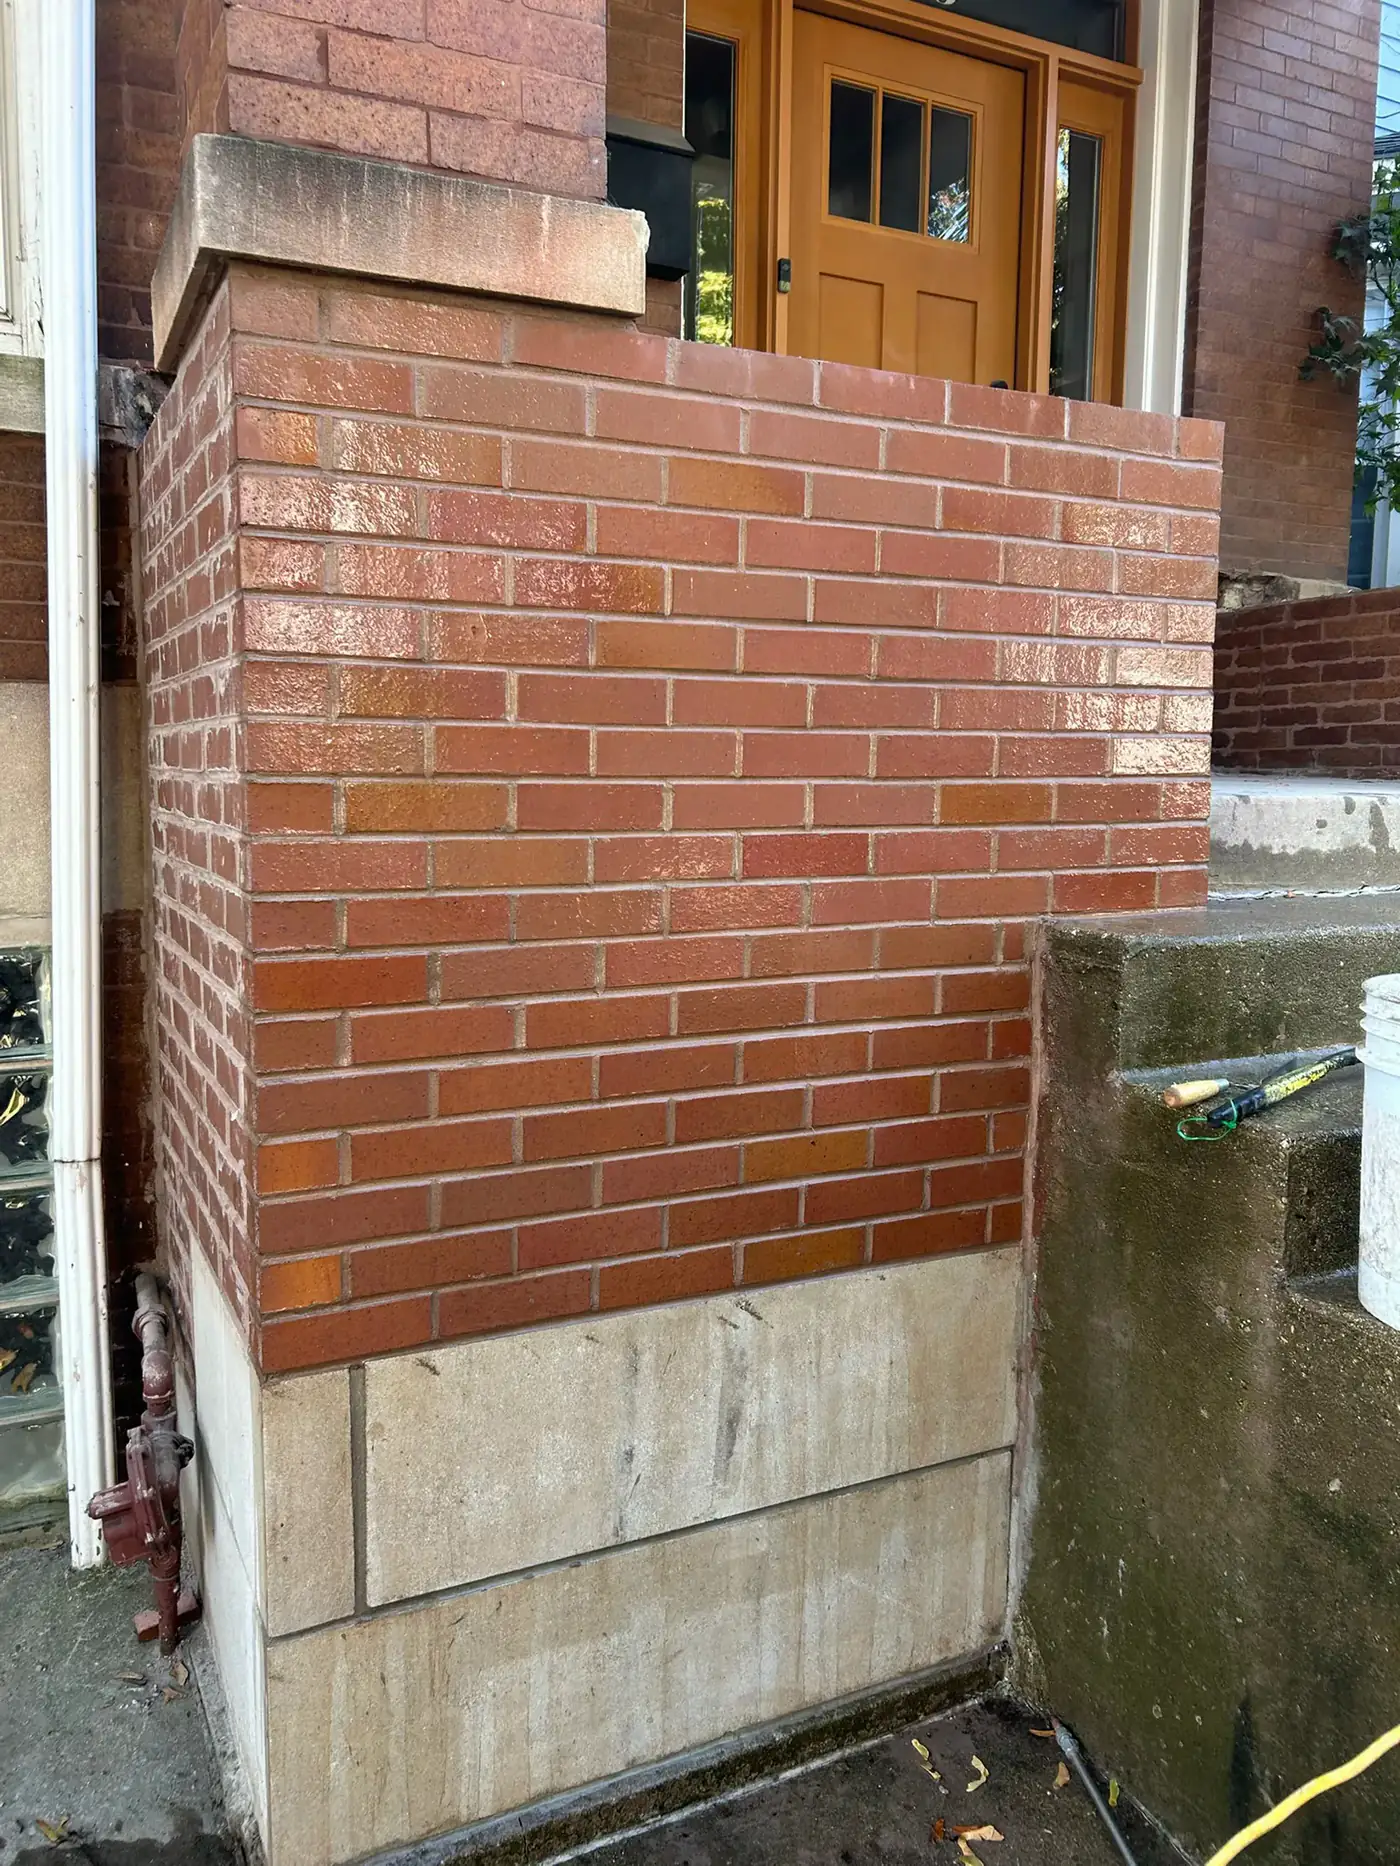
If you're trying to figure out whether your tuckpointing was done right, here's the short answer: a bad tuckpointing job shows mortar smearing on brick faces, wrong mortar color or the wrong joint profile, shallow grinding with fresh mortar "feathered" over the old, brick edges bridged and buried in mortar, and skipped repairs to cracked or spalling brick. Good work looks clean, consistent, and packed full — bad work looks sloppy up close and fails within a winter or two. I'm with Emerald Masonry LLC, a family-owned masonry contractor serving Chicagoland for career masons, and this guide will walk you through inspecting the work joint by joint. If you'd rather have a set of experienced eyes on it, we do free assessments — (708) 288-1696.
Tuckpointing is one of the easiest masonry jobs to fake and one of the hardest to fake well. From a car window, a fresh smear of mortar looks like a repair. It isn't. Below is everything a Chicago homeowner should check before writing the final check.
What a good tuckpointing job actually looks like
Before you can spot bad work, you need to know what right looks like. A quality repointing job has these traits:
- Proper grinding depth. The old, failed mortar is ground or raked out to a depth of at least twice the joint width — usually 3/4 inch to 1 inch. That gives the new mortar real surface area to grab.
- Full, packed joints. New mortar is pressed into the raked joint in thin layers (called lifts) and packed tight, not schmeared on the surface.
- Matched mortar color. The new mortar is tinted and sanded to blend with the original. On a well-matched wall you shouldn't be able to easily tell where the new work stops and the old begins.
- Correct joint profile. The joints are tooled to the same shape as the rest of the building — usually a concave joint on Chicago brick, sometimes a weathered or grapevine profile on older greystone.
- Clean brick faces. The brick is wiped and, where needed, lightly washed so no mortar haze remains on the faces.
- Right mortar for the brick. Softer, older brick gets a softer mortar; hard modern brick can take a stronger mix.
When all six line up, the wall reads as original — like it was never touched. That's the goal of tuckpointing quality work, and it's what separates a mason from someone with a grinder and a bag of premix.
Red flags: signs of bad tuckpointing
Here's the detailed field checklist. Any one of these is a warning; two or more usually means the job needs to be redone.
1. Mortar smeared or "bag-rubbed" over the brick faces
The most common tell. Instead of packing mortar into a ground-out joint, a shortcut contractor rubs a soupy mortar over the whole wall — brick faces included — and calls it pointing. You'll see a gray haze, drips, and mortar riding on top of the brick rather than recessed between it. This "bag rub" or skim coat hides the joints instead of restoring them and peels within a season.
2. Wrong mortar color
New mortar that's bright gray against a warm, aged wall screams that no mortar matching was done. Good masons tint and sand a sample, let it dry (mortar dries lighter), and adjust. A stark mismatch is both an eyesore and a sign corners were cut everywhere else.
3. Wrong joint profile
If the rest of your house has crisp concave joints but the new work is flat, flush, or globbed, the mason didn't tool the joints properly. Mismatched profiles trap water and look obviously patched. The profile should match the surrounding wall exactly.
4. Shallow "skim" or feathered pointing over old mortar
Feathering mortar — thinning fresh mortar to nothing over the top of old, un-ground joints — has no bond and no depth. Scratch it with a key and it flakes. Real repointing requires raking out mortar first; there's no shortcut around the grinding.
5. Mortar bridging or covering the brick edges
When mortar spills over and buries the crisp edges (arrises) of the brick, the joint lines look fat and blurry. Mortar bridging across brick faces also traps moisture against the brick, accelerating freeze-thaw damage.
6. Skipped brick replacement
Tuckpointing addresses mortar, not broken brick. If cracked, spalling brick or badly deteriorated units were pointed around instead of swapped out, the underlying problem is still there. A good crew flags and replaces failed brick as part of the scope.
7. Work done in freezing temperatures
Mortar needs to cure above about 40 degrees. Pointing done during a Chicago cold snap freezes before it sets, leaving weak, powdery joints. A contractor rushing to point in December is a serious tuckpointing red flag.
8. No grinding — just caulk or smear
If someone ran a bead of caulk or troweled mortar over joints without any grinding at all, that's not tuckpointing. It's cosmetic and temporary.
Why hard mortar on soft brick is a hidden red flag
This one you can't always see on day one, but it's the most damaging mistake in the trade. Chicago's older housing stock — the bungalow belt, greystone two-flats, and pre-war homes — was often built with soft, hand-formed brick and lime-based mortar. That soft mortar is sacrificial by design: it's meant to be slightly weaker than the brick so that when the wall moves and freezes, the mortar cracks and can be replaced cheaply, protecting the expensive brick.
When a contractor packs rigid, high-strength Type S mortar into old, soft brick, the relationship flips. Now the mortar is harder than the brick. Every freeze-thaw cycle, the trapped stress has to go somewhere — and it goes into the brick face, popping it off in sheets. This is called spalling, and it's often caused by well-intentioned but wrong tuckpointing.
The fix is matching the mortar to the masonry. Softer historic brick usually wants Type N mortar or a lime-lime mix; harder modern brick can handle a stronger blend. If a contractor can't tell you which mortar type they're using and why, that's the hard mortar soft brick red flag in action.
The correct process a professional follows
Here's the real sequence, so you know what should have happened on your wall:
- Assess and match. Identify the brick, the existing mortar, and the correct joint profile. Mix and cure a color sample.
- Grind or rake to depth. Remove failed mortar to at least twice the joint width (about 3/4"–1"), being careful not to nick the brick edges.
- Clean the joints. Brush and blow out all dust and debris so the new mortar can bond.
- Dampen the joints. Lightly wet the masonry so the dry brick doesn't wick moisture out of the fresh mortar too fast.
- Repack in lifts. Press mortar in thin layers, letting each set slightly before adding the next, until the joint is full.
- Tool the joints. Once the mortar is "thumbprint hard," strike it with the proper jointer to shape the profile and compress the surface.
- Clean and cure. Wipe haze off the brick, and keep the work damp and protected as it cures over several days.
Skip any step and you get one of the red flags above. This is the difference between brick pointing that lasts a generation and a smear that lasts a season.
Good vs. bad tuckpointing at a glance
| What to check | Good tuckpointing | Bad tuckpointing | |---|---|---| | Grinding depth | Raked 3/4"–1" deep | Little or no grinding; skim over old | | Joint fill | Packed full in lifts | Thin, hollow, or feathered | | Mortar color | Matched to original | Stark, mismatched gray | | Joint profile | Tooled to match wall | Flat, globbed, inconsistent | | Brick faces | Clean, no haze | Smeared, hazy, "bag-rubbed" | | Brick repair | Failed brick replaced | Pointed around cracks | | Mortar type | Matched to brick hardness | One-size-fits-all, often too hard | | Weather | Above 40°F, curing | Done in the cold | | Lifespan | 25–30+ years | Fails in 1–3 winters |
How to inspect a finished job yourself
You don't need to be a mason to run this checklist:
- Step back first. From 15 feet, does the wall read as uniform, or can you clearly see where the new work is? Big color and profile mismatches show from here.
- Get close. Run a finger along the joints and across the brick. Feel for gritty smears and haze on the brick faces — there shouldn't be any.
- Check the depth. Look at the joint edge. Is the mortar packed into a real recess, or sitting on the surface? Poke a corner with a key; solid mortar won't flake.
- Match the profile. Compare a new joint to an untouched original. Same shape? Same crispness?
- Look for skipped brick. Scan for cracked or crumbling bricks that were pointed around instead of replaced.
- Check the transitions. Around windows, chimney, and corners — where the work is hardest — sloppy crews get lazy. Chimney tuckpointing especially tends to reveal shortcuts.
If several checks fail, don't accept the work. This is exactly the kind of tuckpointing inspection a homeowner in Oak Lawn or Orland Park can do in twenty minutes before signing off.
What drives the cost of doing it right
Homeowners always ask for a flat price, and an honest mason can't give one over the phone — because the real cost depends on real factors:
- Access and height — ground-floor walls vs. multi-story work needing scaffolding or a lift.
- Wall area and joint condition — how many square feet, and how badly the mortar has failed.
- Brick and mortar matching — historic greystone and custom color matching take more skill and time.
- Brick replacement — how many spalled or cracked units need swapping.
- Prep and protection — masking, cleanup, and weather considerations.
A suspiciously cheap bid usually means one thing: they're planning to skip the grinding. Cheap tuckpointing and good tuckpointing are almost never the same job. The right move is a free estimate where a mason sees the actual wall. Emerald provides those at no charge across Chicagoland.
DIY or handyman vs. a professional mason
A steady handyman can point a small, non-structural patch. But tuckpointing done wrong is expensive to undo, and the two failures amateurs and general contractors make most are (1) not grinding deep enough and (2) using the wrong mortar. Both are invisible on day one and catastrophic three winters later. When the work is on a chimney, a load-bearing wall, or historic brick, it belongs with a licensed insured mason who does this every day — not a generalist with a rented grinder.
Chicago context: why our walls are unforgiving
Chicagoland masonry takes a beating. Our freeze-thaw swings — water seeps into joints, freezes, expands, thaws, repeats — are exactly what mortar joints are designed to absorb. That's why the details matter more here than in a mild climate. The bungalow belt, the greystones, the classic two-flats: many were built a century ago with soft brick that punishes the wrong mortar. In neighborhoods and suburbs like Oak Lawn and Orland Park, we regularly get called to fix tuckpointing that was done just a few years earlier by someone who didn't respect the freeze-thaw cycle or the brick. Good work here isn't optional — it's the only kind that survives.
What to do if you already got a bad job
If you're reading this because something already looks off, here's the path:
- Get an honest assessment. Have a qualified mason look in person. Some poor work can be corrected; some has to be ground out and redone properly.
- Document it. Photos and dates help if you need to go back to the original contractor.
- Fix the root cause. If wrong mortar or shallow grinding was used, a proper redo — correct depth, matched mortar, tooled joints — is the only real solution.
- Consider sealing after. Once the joints are sound, breathable masonry sealing can add protection against water intrusion (never as a substitute for repointing).
We see redo work constantly, and we'll always tell you straight whether your existing job can be saved or needs to be done over.
Related services
- Tuckpointing — full grind-and-repoint, color and profile matched
- Brick repair — replacing cracked and spalled brick the right way
- Masonry sealing — breathable water protection for sound masonry
Frequently asked questions
What does a bad tuckpointing job look like? Mortar smeared across the brick faces, joints that don't match the original color or profile, and a thin skim riding on top of old mortar instead of packed into a ground-out joint. Cracked or hazy brick faces are another giveaway.
How deep should mortar be ground out? At least twice the joint width — roughly 3/4 to 1 inch. Shallower than that and the new mortar has nothing to bond to.
Is tuckpointing the same as repointing? In everyday Chicago usage, yes — both mean restoring your mortar joints. Technically repointing is the grind-and-repack, and tuckpointing is a two-color decorative finish, but the words are used interchangeably.
Why is hard Type S mortar on old brick a problem? It becomes harder than the soft historic brick, so freeze-thaw stress cracks and spalls the brick face instead of the sacrificial mortar. Old brick usually wants softer Type N or a lime mix.
How long should good tuckpointing last? 25 to 30 years or more when it's done right. A skim job can fail in one to three Chicago winters.
Can tuckpointing be done in winter? It shouldn't be. Mortar needs about 40 degrees and rising to cure. Freezing weather leaves weak, crumbling joints.
What should I do if I already got a bad job? Have a qualified mason assess it in person to see whether it's correctable or needs to be redone. Emerald offers free assessments across Chicagoland.
The bottom line
A bad tuckpointing job hides behind a fresh-looking smear — but now you know exactly where to look: grinding depth, packed joints, matched color and profile, clean brick, the right mortar for your brick, and no freezing-weather shortcuts. If any of those fail, the job won't.
At Emerald Masonry LLC, we've spent career masons doing color- and profile-matched tuckpointing across Chicagoland — including plenty of redo work for homeowners who got burned the first time. We're family-owned, licensed, bonded, and insured, and every estimate is free and honest. Whether you want a wall inspected or a whole building repointed the right way, we'll tell you straight what we see.
Call (708) 288-1696, email emeraldmasonryil@gmail.com, or reach out through our contact page. Serving Palos Heights and all of Chicagoland — emeraldmasonryil.com.
Frequently Asked Questions
What does a bad tuckpointing job look like?
A bad tuckpointing job shows mortar smeared across the brick faces, joints that don't match the original color or profile, and a thin skim of new mortar riding on top of old material instead of packed into a ground-out joint. You'll often also see cracked or hazy brick faces from acid or grinder overreach.
How deep should mortar be ground out for tuckpointing?
A proper repointing job grinds or rakes out the old mortar to a depth of at least twice the joint width — usually about 3/4 to 1 inch. Anything shallower doesn't give the new mortar enough surface to bond and it will pop out within a couple of freeze-thaw seasons.
What's the difference between tuckpointing and repointing?
Technically, repointing is grinding out failed mortar and packing in fresh mortar, while tuckpointing is a decorative technique using two mortar colors to create a crisp fine line. In everyday Chicago use the two words are treated as the same job — restoring the mortar joints between your bricks.
Why is hard Type S mortar on old brick a red flag?
Soft, historic Chicago brick needs a softer mortar (often Type N or a lime mix) that flexes and gives. When a contractor packs rigid Type S mortar into old brick, the mortar becomes harder than the brick, so freeze-thaw stress cracks and spalls the brick face instead of the sacrificial mortar. It's a common and costly mistake.
Can I inspect a finished tuckpointing job myself?
Yes. Stand back and check for uniform color and joint profile, then get close and run your finger along the joints for smeared mortar and hazing on the brick. Look for full, packed joints rather than a thin skim, and confirm any cracked or crumbling bricks were actually replaced.
How long should good tuckpointing last?
Quality tuckpointing with matched mortar, proper grinding depth, and clean tooled joints typically lasts 25 to 30 years or more in the Chicago climate. A cut-rate skim job can start failing in one to three winters, which is often the first sign something was done wrong.
Should tuckpointing be done in cold weather?
No. Mortar needs above-freezing temperatures to cure properly — generally 40 degrees and rising. Tuckpointing done in freezing Chicago weather won't set correctly, leading to weak, crumbling joints. A contractor pushing to point your walls in December is a red flag.
What should I do if I already got a bad tuckpointing job?
Have a qualified mason assess the work in person to see whether it can be corrected or needs to be ground out and redone. Emerald Masonry LLC provides honest, free assessments across Chicagoland — call (708) 288-1696 and we'll tell you exactly what we see.